Updated on April 3rd, 2022
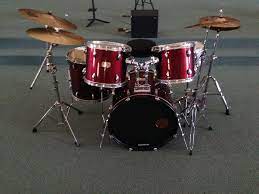
Do you wish you could acquire a drum set but are unable to do so due to the high cost of such equipment on the market? We can show you how to create a DIY homemade drum set for little or no money and get your kids enthusiastic about these percussion instruments that can make fun sounds. As a result, you do not need to be concerned; simply read this article for more details.
These percussion instruments are relatively simple to construct with common household items, saving you a lot of money. Examine the steps and methods in detail.
Why Should You Make Your Own Kit?
Many individuals will tell you that making your own drum set is an excellent method to get a high-quality drum set for a low price. This is certainly true, but if you get too carried away with the possibilities, your budget will inevitably grow.
Aside from the financial advantages, assembling a drum yourself creates a closeness that you won't find with a store-bought kit. You'll have thoroughly inspected your shells and installed all of the necessary gear, which is an exciting experience. Also, if you have extremely precise requirements for the style, size, and function of your drums, designing and assembling your own kit assures that you get exactly what you want, down to the smallest detail.
Using Artificial Leather Materials to Make Drums (For Kids)

Scissors, rope, a tin can or container, a marker, and artificial or imitation leather material are some of the materials you'll need for this project. Place the tin on the leather's back area and make two marks around the can. You'll use those marks to cut off the bottom and top of the drum. It's a good idea to add around two inches to the marks on the material before cutting to allow you to line the edges of the leather with rope or thread if necessary.
You can use the scissors to make little cuts and clips around the tin to help you fasten the rope through the holes. Then, to make your drum strong and stable, place these strips of leather on top and bottom of the tin and bind them together. You can now inspect the drum by evaluating its quality and sound.
Professional Homemade Drum Sets (For Adults)

Plan Well
- Before you get carried away and start filling your shopping carts with materials you may or may not need, it's critical to start the process of creating your own kit by deciding on a few crucial designs, layout, desired sonic characteristics, and hardware options. Visit the websites of numerous drum component retailers to get a sense of the hardware that is available. You'll also find that the employees at these establishments are frequently eager to spend some quality time on the phone with you exploring your alternatives. This is a fantastic method to educate yourself while you're putting together your new gear. Planning ahead of time will keep you from making some typical blunders, as well as from ordering items you may not need and spending extra money.
- Early on in the process, having a very clear idea of the design, color scheme, and overall ‘look' you want. This will greatly assist you to make the right decisions. Is there a particular kit you're attempting to replicate? Maybe Lars' 90s black and white kit, Neil Peart's most current kit, or Ringo's iconic Ludwig kit? If that's the case, choose to look for photographs that you can use as inspiration and then print them off.
- What colors do you prefer? This is a good question to ask not only about the color of the shells but also about the hardware, as powder painting lugs and hoops to a certain color is a well-traveled (though expensive) path. The color and finish you choose for the shells, in particular, will determine whether they are coated, painted, or lacquered.
- Do you have a favorite lug shape (e.g., DW/George Way-type, teardrop, antique Slingerland, etc.)? The shape and style of your lugs are a good location to start the design process because they will impact not only the remainder of your hardware choices but also the drums' finish.
- This may be the simplest factor in the entire process for some, but it may be the most challenging for others. Do you require a single snare drum? Is this a four-piece set? Is that a nine-piece kit? The advantage of making the kit yourself is that you can control the shells and hardware you place on the drum — you'll be able to recreate the procedure relatively easily if you choose to start small and add more drums to the kit as budget allows.
- Shell Sizes: The size and quantity of drums you order will be primarily determined by the sort of music you play. The cost of assembling larger drums vs smaller drums is an essential factor to consider. Shells for a four-piece ‘fusion' kit with an 18′′ kick and shallow toms, for example, will likely cost a few hundred dollars less than a four-piece rock kit with a 24′′ kick and enormous toms in the Dave Grohl style.
- Shell Composition: Maple shells are by far the most popular shell type on the market, as they are the most resonant and are associated with high-quality kits.
- Reinforcement Rings: Installed on the top and bottom bearing edges of a drum, reinforcement rings provide the shells with extra stability and longevity. They are commonly used for heavy use and/or high tension kits. They do diminish the shell's resonance a little because there is more material that needs to be musically "stimulated."
- There are two basic possibilities when it comes to mounting hang or rack toms.
Bracket mounts are a "conventional" mount, in which a bracket is attached to the side of the drum into which a tom arm can be put and the drum is clamped. Suspension mounts come in a variety of styles, but they normally use the lugs or tension rods on the outside of the drum to ‘suspend' the drum without drilling into it.
Make a List
We know it sounds simple, but we recommend keeping a detailed list of the products you need to get, as well as where you plan to get them from and how much they will cost. By producing this solid list, you'll be able to make your shopping a lot easier because you'll know exactly where you'll acquire what and how much it'll cost.
Inspection Before Assembling the Parts

- It's tempting to open all the boxes as soon as they arrive and start screwing everything together, but this is a surefire way to lose pieces and damage some items. As you prepare to assemble your gear, our advice is to take it carefully and deliberately.
- The next step is to inspect all of the parts you received to make sure none of them were damaged during shipping or are defective.
- In the case of shells, carefully inspect the bearing edges for any dimples or damage. The edge should be razor-sharp. One suggestion is to place the shell gently on a flat surface that you know is totally flat.
- All the way around the drum, the bearing edge should make good contact with the surface. If it doesn't, you're probably dealing with some warping or damage.
- When it comes to hardware, look for items like chrome quality, lug inserts that aren't missing, and screws that thread well.
Tools Required for Assembly
- Drum Key
- screwdriver (Philips head is most common for lug screws, though we have seen some with an Allen head)
- You'll probably need this to tighten the air vent or draw the snare wire straps with pliers
- Shop rag
- (Optional) You can do all of the above using an electric screwdriver, but be careful and use low torque settings to avoid breaking your lug screws.
- (Optional) Loctite - some people use a little Loctite on the mounting screws to keep them from backing out over time (not the tension rods).
- Grease for tension rods (optional) if you're like that sort of thing.
Assembling the Parts

- To begin, attach the lugs to the drum with the lug screws you purchased, taking care to install a grommet behind each lug.
- After you've attached the lugs, you should fasten any extra bracketry or vents you're placing on the drum.
- After you've secured all of the hardware to the shell, go over everything one last time to make sure everything looks aligned, as this will be your last chance to tighten things up.
- You're ready to slap your new drum heads on each drum, get the hoops positioned over the head, and start threading tension rods for tuning at this stage.
- Tune the drum as you normally would. This is the same process as tuning any other drum in your collection. Hearing your new creature come to life right before your eyes is a thrilling experience.
If you follow the steps we explained above on homemade drum sets, you will not only spend less money on drums, but you will enjoy fantastic tunes and they will endure a long time.
More to read:
Best Hand Drums 2021 – Our Reviews and Comparisons
We hope you love our reviews! For your information, we do earn money from commission in the link in the content! For more information click here!


